 Scissorhands:
Find a pair of black gloves you don't care about. Thriftstores are a good source. As of winter 2003, Target was selling sets of two pairs of the small knit gloves for only $1.50! The gloves I used are black knit gloves that had little rubber grip dots on them. We used the grip on the back of the hands since it looked a little more "industrial."
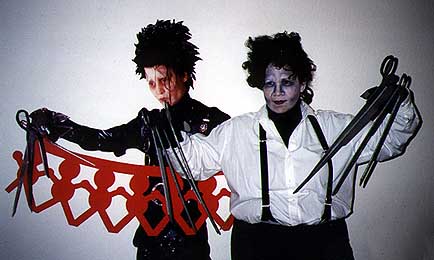
Foamcore board is nice and light and has a better cut edge than corrugated cardboard, and also does not have the slight ribbing that the corrugated board does, so the blades remain looking smooth like metal. Since I had the movie video (yes, now I have the DVD, too!), I was able to freeze frames to gauge how long and what shape each blade was. Then I drew the blades out individually on the foamcore board (note that some blades include the scissors handle and some do not), and cut them out very carefully with a craft knife so the points stayed intact as points. After all the blades were cut out, I spray-painted them all silver, including the cut edges. I used paint or markers for the scissor handles after the silver was fully dry. Then I hot-glued the individual blades to the sides of the fingers of the gloves so that they would stay vertical when the fingers move to be the scissors motion. It is easiest to have someone wearing the gloves with the other person hot-gluing (I use the cool-temp hot glue so there is no danger of being burnt), since that way you can get the positioning correct and the glued gloves will stretch properly later when they are worn again. Make sure you have a long enough portion of the base of the blade lengthwise along the outside edge of each finger, at least a full inch of glue, or they will not move smoothly with your real fingers. While the hot-glue is cooling, squeeze the blade gently (don't bend your foamcore!) into the glove for the best seal. The hardest part is taking the gloves off once you have them on!
Due to so many recent (2003) inquiries in how to make the scissorhands, I have made a GIF with the pieces numbered with the index finger as #1 and pinky as #4, also labeled right (R) or left (L). The GIF itself should print as 22" wide by a little over 11" tall, which is the size I used for my scissorhands. Most likely you won't have access to a printer that has paper that large, but at least it gives you the size. You could either use an image editing program to chop the large image into several 8.5x11" pages and tape them together for your pattern, or you could print the entire GIF out shrunk to fit your printer paper, then enlarge it by hand on your foamcore board.
Scissorhands Template
Makeup:
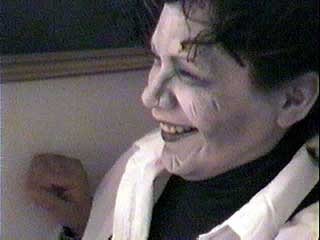
I found a very pale blue shade of stage pancake makeup at a costume store. The name is "Blythe Spirit", and it is perfect for Edward's skin tone. If you cannot find that perfect shade, the easiest would probably be to use plain white base (like clown makeup that is EVERYWHERE around Halloween), then use a dark blue eyeshadow in very small amounts to shade the whole face before starting the scars or other dramatic shading. With facial tissues stuck in the neckline of the turtleneck so it is protected against the makeup, apply the base makeup with a cosmetic sponge to get it smooth, and set it with plain white talcum powder so it won't rub off as easily.
First I did the dramatic shading on the pale blue base. I used a dark blue eyeshadow, a dark charcoal gray eyeshadow, and various sizes of makeup brushes to get the sad tilt to the eyebrows and eyesockets, as well as the sunken cheekbones and to emphasize under the chin. Be careful to start with small amounts on your brush and use very light strokes, since you can always add more color, and you want blending, not lines of color.
After the major shape of the face was done, I used a white eyepencil and a royal blue eyepencil for the scars. Make sure your pencils are sharpened to a good point, and resharpen while you're working if your lines are becoming too thick and undefined. There are a few good closeup shots of Edward's face in the movie, so I used those for the placement of the scars. Just drawing the white line right next to the dark blue line gives the effect of the scar line. (Old age lines can be done the same way for stage makeup effects.)

Hair:
Luckily, Maria had short dark brown hair, so we just used the black hairspray and lots of gel, hairspray and bobby pins to get her hair like the image. However, there are relatively cheap Elvis-style costume wigs that I have successfully messed enough to approximate Edward's hair.
Clothing:
For the outfit, I went the easy route & used his "dressed-up" look of the white shirt, suspenders and slacks. If you get ambitious, you could try the black outfit with all the loops and buckles and everything, but that would be much more difficult.
Wear a black turtleneck underneath a white mens collared shirt, preferably slashed a few times, so find an old shirt or find one at a thiftstore that you can slash.
Find some old plain black suspenders, preferably clip so they can clip on any pants, but you can pin on the button-style suspenders to the waist of the pants. Cut the suspenders about mid-chest level, then pin them back together with safety pins.
Attach the suspenders to a pair of black pants, preferably mens suit-type slacks, not jeans or sweatpants.
Any black shoes with black socks will do.
Now you now know exactly how I did my Edward costume, even though I didn't wear it myself... :-)
